
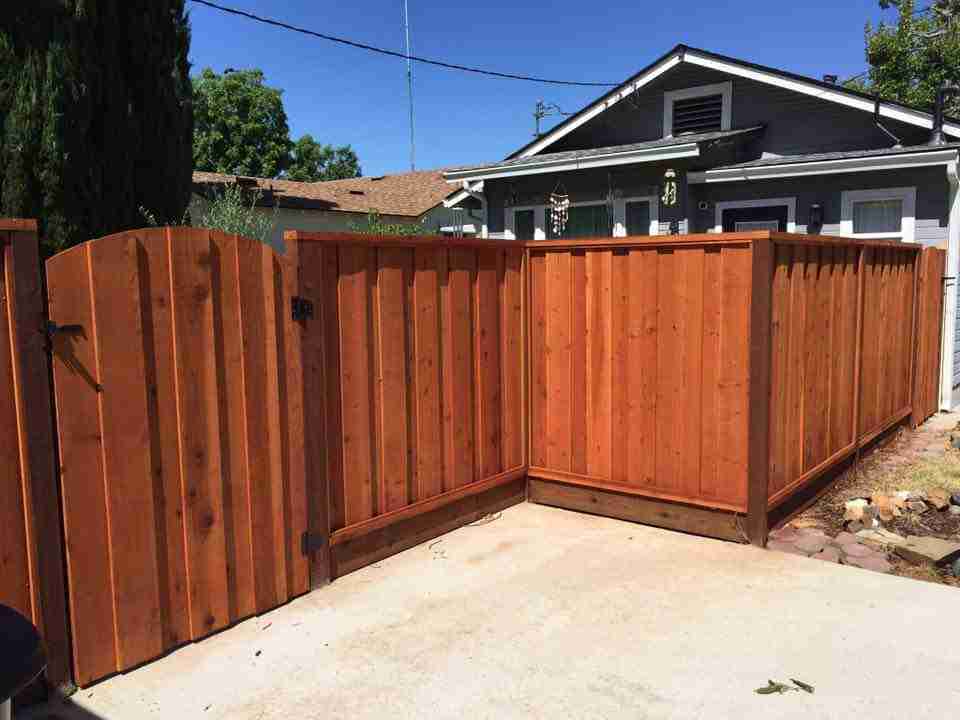
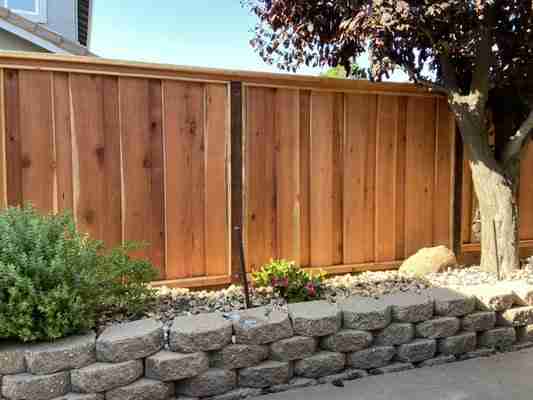
Maintaining the aesthetic appeal and longevity of a redwood fence often hinges on proper staining techniques. The rich hues of redwood not only enhance the beauty of outdoor spaces but also serve as a protective barrier against the elements. In this guide, we delve into essential tips to ensure your redwood fence staining project yields a flawless finish.
Firstly, preparation is paramount. Begin by thoroughly cleaning the surface of the fence to remove dirt, debris, and any previous coatings. This step not only ensures better adhesion but also prevents uneven staining. Next, assess the condition of the wood for any signs of damage or decay, addressing any issues before proceeding with staining. Additionally, selecting the appropriate stain and application method based on your desired finish and environmental factors is crucial for optimal results. With meticulous preparation and the right approach, your redwood fence can boast a stunning finish that withstands the test of time.
Choosing the Right Stain
Choosing the right stain is a pivotal decision in ensuring the aesthetic appeal and longevity of your redwood fence. Deliberate over various factors, including your preferred color tone, transparency level (whether transparent, semi-transparent, or solid), and the degree of UV protection needed. Transparent stains accentuate the innate beauty of the wood, allowing its natural grain and texture to shine through. On the other hand, solid stains provide comprehensive coverage and enhanced protection against the elements.
It’s imperative to select stains explicitly designed for redwood, as they are formulated to complement its unique characteristics, ensuring compatibility and optimal performance. By thoughtfully considering these aspects, you can make an informed choice that not only enhances the visual allure of your fence but also fortifies it against wear and tear, ultimately prolonging its lifespan.
Preparing the Redwood Surface
Proper preparation is the cornerstone of any successful staining project. Start by meticulously cleaning the redwood surface, ensuring it’s free from any dirt, grime, or remnants of previous coatings. Utilize a stiff brush or a pressure washer to effectively remove debris and reveal the natural beauty of the wood. After cleaning, it’s crucial to allow the wood to dry thoroughly before applying the stain to ensure optimal adhesion and penetration.
Furthermore, consider lightly sanding the surface to address any rough patches or imperfections, which not only enhances the aesthetic appeal but also promotes a more uniform finish. Taking the time to prepare the redwood surface properly sets the stage for a flawless staining process and ensures that your fence maintains its beauty and durability for years to come.
Assessing Wood Condition
Before proceeding with staining, it’s essential to conduct a thorough assessment of the redwood’s condition. Inspect the surface for any visible signs of damage, including cracks, splinters, or rot. Promptly addressing these issues is crucial to ensuring the longevity of your fence and achieving a uniform stain application.
Repairing damaged areas not only preserves the structural integrity of the wood but also enhances its aesthetic appeal. Be diligent in replacing severely damaged or rotted wood sections to maintain the overall integrity of the fence. By investing the time to assess and repair the wood conditioner before staining, you set the stage for a more successful outcome, with a beautifully finished redwood fence that stands the test of time.
Repairing Damage and Decay
Before proceeding with staining, it’s imperative to address any damage or decay present in the redwood. Start by conducting a comprehensive inspection of the fence, meticulously scrutinizing for indications of rot, cracks, or loose boards. Swiftly replace any severely compromised sections with fresh redwood boards to uphold the fence’s structural integrity.
Moreover, meticulously fill in any detected cracks or gaps with a suitable wood filler, ensuring a seamless surface. Once filled, sand the area smooth to create a uniform canvas for staining. This proactive approach not only enhances the aesthetic appeal of your fence but also significantly extends its lifespan by fortifying it against future deterioration. By prioritizing the repair of damage and decay, you lay a solid foundation for a striking and enduring finish that will stand the test of time.
Selecting the Appropriate Application Method
The method of applying stain to your redwood surface plays a crucial role in achieving the desired outcome. Brushing, rolling, or spraying are common techniques, each with its own set of advantages and considerations. Brush application, for instance, provides greater control over coverage and detail, allowing for precise application in intricate areas. On the other hand, spraying may be more efficient for covering larger expanses of the fence quickly.
When deciding on the best method for your project, take into account factors such as the size of the area to be stained, your level of experience with each technique, and the specific finish you’re aiming for. It’s often beneficial to experiment with different methods on a small test area beforehand to determine which approach yields the most satisfactory results for your particular staining endeavor.
Ensuring Even Coverage
Achieving consistent and even coverage is paramount in attaining a professional-grade finish for your redwood fence. Regardless of the application method employed, it’s crucial to ensure the stain is distributed evenly across the entire surface. Commence from the top and progress downwards, guaranteeing each section receives uniform treatment. Vigilantly manage overlapping strokes to avert unsightly lap marks or streaks, which can mar the final appearance.
Particularly for expansive or intricately designed areas, working in smaller sections enhances control and facilitates thorough coverage. Taking your time during the staining process is imperative; consider applying multiple thin coats as needed to achieve the desired depth of color and protection. By adhering to these meticulous steps, you’ll not only enhance the aesthetic allure of your redwood fence but also fortify its longevity against the elements.
Weather Considerations
Weather conditions can significantly impact the success of your staining project. Ideally, choose a day with mild temperatures, low humidity, and minimal wind for optimal results. Avoid staining your redwood fence in direct sunlight, as it can cause the stain to dry too quickly, leading to uneven application and potential adhesion issues. Conversely, staining in excessively cold or wet conditions can impede drying and result in poor penetration and adhesion.
Check the weather forecast and plan your staining project accordingly, ensuring the conditions are conducive to achieving the best possible outcome.
Maintaining Consistency in Color
Consistency in color is essential for achieving a cohesive and visually appealing finish. To maintain consistency, use the same batch of stain throughout the entire project, mixing multiple cans together if necessary to ensure uniformity.
Additionally, apply the stain evenly and consistently across all sections of the redwood surface, taking care to avoid overlaps or gaps. Consider testing the stain on a small inconspicuous area before proceeding to ensure it matches your desired color and appearance. Regularly stir the stain during application to keep the pigments evenly distributed and prevent variations in color.
Sealing for Longevity
Applying a sealer after staining can enhance the durability and longevity of your redwood fence. Sealers provide an additional layer of protection against moisture, UV rays, and other environmental factors, helping to prevent premature fading, cracking, or warping. Choose a high-quality sealer specifically formulated for use on redwood and follow the manufacturer’s instructions for application.
Typically, sealers can be brushed, rolled, or sprayed onto the stained surface and may require multiple coats for optimal protection. Allow the sealer to dry completely before exposing the fence to foot traffic or adverse weather conditions.
Post-Staining Care and Maintenance
Proper care and maintenance are essential for preserving the beauty and integrity of your newly stained redwood fence. After allowing the stain and sealer to dry completely, regularly inspect the fence for any signs of wear, damage, or discoloration. Address any issues promptly by cleaning the surface and applying touch-up stain or sealer as needed. Additionally, consider reapplying a fresh coat of sealer every few years to maintain optimal protection and appearance.
Avoid harsh chemicals or abrasive cleaning methods that could damage the stain or wood surface, opting instead for gentle cleaning solutions and techniques. With proper care and maintenance, your redwood fence can retain its beauty and durability for years to come.
Achieving a beautiful finish for your redwood fence requires careful consideration, meticulous preparation, and proper maintenance. By following the tips outlined in this guide, including selecting the right stain, preparing the surface adequately, and maintaining consistency in application, you can ensure a stunning and long-lasting result. Remember to assess the wood condition, repair any damage or decay, and choose the appropriate application method based on your project’s needs. Additionally, factor in weather considerations and seal the stained surface for enhanced protection and longevity. With diligent post-staining care and maintenance, your redwood fence will continue to be a source of pride and enjoyment for years to come.
For professional assistance with your fencing needs, contact High Quality Fence at 209-815-9015 or email us at info@highqualityfence.com. Our team of experts is ready to help you achieve the perfect redwood fence for your outdoor space. Let us turn your vision into reality today!